5 minutes
Build Your Own Javascript Game in 5 Minutes
Hello Phaser.io (version 3)
Phaser is a JavaScript library which makes it super easy for you to build games. It builds on top of WebGL, but if your browser doesn’t support that, falls back to canvas support. In this quick post, I will show you how to get up and running with your first game in literally 5 minutes (if you take mine as a starter). Note that I use the new version 3 while many tutorials and example games are written in version 2.
Prerequisites
The only thing you need is to make sure you have a local webserver installed, so you can serve your pages from localhost or 127.0.0.1. There are many possibilities to do so - an easy one is Apache2 which often is already bundled in Linux distributions. If not, you should be able to install it by running:
sudo apt-get update
sudo apt-get install apache2
The game we are building
The game is super simple. You are a hero in a Zelda like environment and you need to collect hearts. For each heart you collect, you gain 100 points, but a new hole appears in the world. If you touch a hole, you loose the game. This is how the game looks at startup:
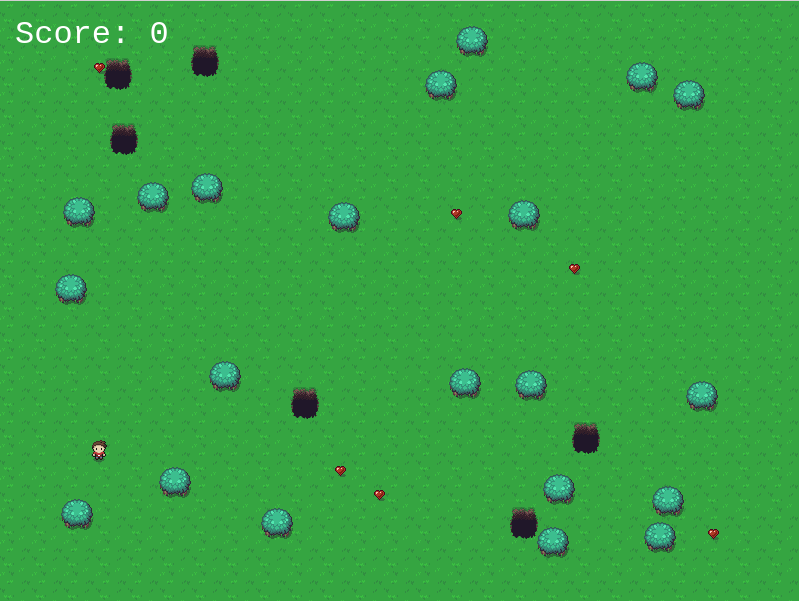
Start of the game
And when you touch a hole, the game ends:
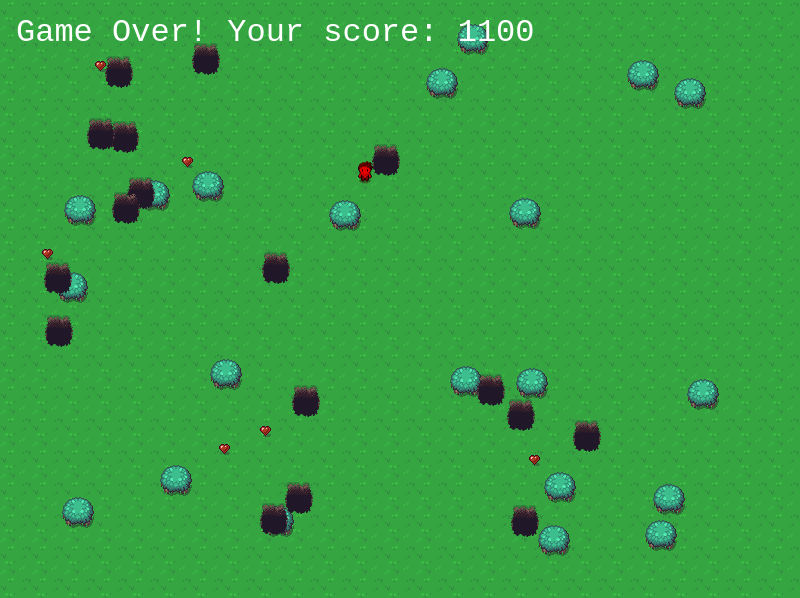
Start of the game
To control the game, you use the keyboard’s arrow keys.
The building blocks
The preload function
As the name indicates, the function is used to preload all your game’s assets like images or sounds. It is as easy as:
function preload() {
    this.load.image('background', 'assets/background.png');
    this.load.spritesheet('hero', 'assets/hero.png',
        { frameWidth: 16, frameHeight: 24 }
    );
}
Here, we are loading an image which we refer to as background and a spritesheet which we refer to as hero.
The create function
The assets which you preloaded before, aren’t shown to the user, yet. Here comes create!
The order in which you add the items matter, it’s like layers in Photoshop or Gimp. Simply add backgrounds first, then other objects later.
Be like:
function create() {
    this.add.tileSprite(400, 300, 800, 600, 'background'); // Our background is a 32x32px tile, we stretch it over the whole game area
    this.physics.add.sprite(100, 450, 'hero'); // The hero is now on top of the background, see below for details
}
Creating static objects
If you want to have objects in your game which you want to interact with the player, e.g. the player cannot pass them or the player can collect them, it is a good idea to create them as a so-called staticGroup.
function create() {
    // ...
    trees = this.physics.add.staticGroup();
}
Creating the player
For the player, it is nice to have a movement animation. That is why in the preload function we used the this.load.spritesheet. Doing so, we can have an image with multiple small images which are all sized the same way (here: 16px width and 24px height).
The animations are global and can be bound to many objects:
function create() {
    // ...
    this.anims.create({
        key: 'down',
        frames: this.anims.generateFrameNumbers('hero', { start: 0, end: 3 }),
        frameRate: 10,
        repeat: -1
    });
}
Here we are creating a down animation which should play the frames 0-3 from our hero sprite. The frameRate is 10 and we want to repeat it indefinitely (-1).
We do that for all movement directions and add another animation for standing still which has just a single frame.
Physics engine: applying gravity
In my game, I didn’t need gravity for the 2d game, but Phaser comes with nice physics support. Check it out if you are interested.
Player movement
Keyboard support comes right out of the box. Simply call cursors = this.input.keyboard.createCursorKeys(); in the create() function, then you can use the cursors in the update() function to play animations:
function update() {
    // ...
    if (cursors.left.isDown) {
        hero.setVelocityX(-160);
        hero.setVelocityY(0);
        hero.anims.play('left', true);
    } else if (cursors.right.isDown) {
    // ...
    }
}
Basically, we are telling our game to move our character in the negative x direction which is to the left as long as the left button is pressed. While doing so, we make sure, it doesn’t move in the y direction and we play the left animation which we defined in our create() function before.
Creating a score
To keep score of the game, we use a variable score and a text placeholder called scoreText.
In the create() function we initialize a 0 score: scoreText = this.add.text(16, 16, 'Score: 0', { fontSize: '32px', fill: '#FFF' });.
And whenever we change the score, we can update it like this:
score += 100;
scoreText.setText('Score: ' + score);
Create objects to interact with
Of course, our hero is not alone. In my game, I created hearts which the hero can collect and get points for and holes which the hero can fall into and loose the game. I created them as a staticGroup like the trees above. Phaser makes the interactions with our hero very easy by defining overlap events:
function create() {
    // ...
    hearts = this.physics.add.staticGroup();
    for (var i=0; i<=5; i++) { // Create 5 hearts at random positions
        hearts.create(Phaser.Math.RND.integerInRange(32, 750), Phaser.Math.RND.integerInRange(32, 550), 'heart');
    }
    this.physics.add.overlap(hero, hearts, grabAHeart, null, this);
    this.physics.add.overlap(hero, holes, fallIntoHole, null, this);
}
Afterwards, you simply define your custom functions grabAHeart and fallIntoHole to decide on what to do in these cases:
function grabAHeart(hero, heart) {
    heart.disableBody(true, true); // Let the heart disappear
    score += 100; // Increase the score
    scoreText.setText('Score: ' + score); // Update the score display
    heart.x = Phaser.Math.RND.integerInRange(32, 750); // Set the heart to a new random position
    heart.y = Phaser.Math.RND.integerInRange(32, 550);
    heart.enableBody(true, heart.x, heart.y, true, true); // Let the heart appear at the new position
    holes.create(Phaser.Math.RND.integerInRange(32, 750), Phaser.Math.RND.integerInRange(32, 550), 'hole'); // Create a new hole
}

function fallIntoHole(hero, hole) {
    gameOver = true;
    this.physics.pause(); // Stop the physics processing
    hero.anims.play('nomove', true); // Put our hero into neutral position
    hero.setTint(0xff0000); // Make the hero red
    scoreText.setText("Game Over! Your score: " + score); // Set the game over text
}
From here
You can follow along the game creation process by following my git commits. I separated each addition into a new commit: https://github.com/mpaepper/simpleGameWithPhaser