10 minutes
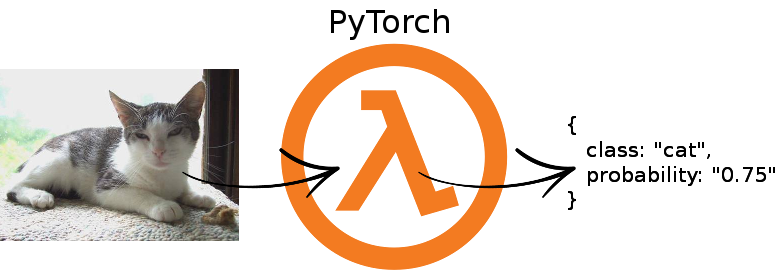
PyTorch Model in Production as a Serverless REST API
PyTorch is great to quickly prototype your ideas and get up and running with deep learning. Since it is very pythonic, you can simply debug it in PyCharm as you are used to in regular Python.
However, when it comes to serving your model in production the question arises: how to do it?
There are many possibilities to do so, but in this post, you will learn how to serve it as a lambda function in a serverless manner on AWS. The advantage of doing so is that you get billed only when the function gets used, so this is ideal as a REST endpoint where you can charge your customers depending on the number of requests.
Be aware that I will not cover authentication, but rather just the main part of supplying an endpoint where you can send a POST request with an image and you will get the classification of that image as a result.
Structure of our project
Our project fill feature two parts. The first part is to train a basic CIFAR model with PyTorch. The model, the image target classes and a zipped part of both of these will be in a folder called model.
The second part is the AWS part in the folder aws where we define our lambda function (pytorch/prediction.py) as well as some files to automate the uploading to AWS and provisioning a REST endpoint.
This is the tree view of our project:
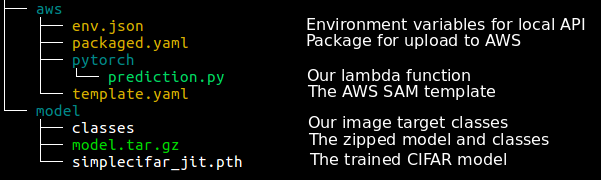
Project overview for serverless PyTorch
You can find all the source code on Github at: mpaepper/pytorch-serverless
Training a basic CIFAR model for image classification
To have an easy model, I am using the code from the PyTorch CIFAR tutorial which classifies images between 10 different classes and is quick to train.
Let’s dive in by picking our imports:
import torch, torchvision, os, tarfile, boto3
import torchvision.transforms as transforms
Getting the data
PyTorch comes with the CIFAR10 dataset which consists of images sized 32x32 pixels and 10 possible image classes. We are using a preprocessing to transform the images to tensors and normalize them:
preprocess = transforms.Compose([
    transforms.ToTensor(),
    transforms.Normalize((0.5, 0.5, 0.5), (0.5, 0.5, 0.5))
])

train = torchvision.datasets.CIFAR10(root='./cifar10', train=True, download=True, transform=preprocess)
trainloader = torch.utils.data.DataLoader(train, batch_size=4, num_workers=2, shuffle=True)

classes = ('plane', 'car', 'bird', 'cat', 'deer', 'dog', 'frog', 'horse', 'ship', 'truck')
Defining the model
The model uses two convolutional layers followed by three fully connected layers and is very basic:
import torch.nn as nn
import torch.nn.functional as F

class Net(nn.Module):
    def __init__(self):
        super(Net, self).__init__()
        self.conv1 = nn.Conv2d(3, 6, 5)
        self.pool = nn.MaxPool2d(2, 2)
        self.conv2 = nn.Conv2d(6, 16, 5)
        self.fc1 = nn.Linear(16 * 5 * 5, 120)
        self.fc2 = nn.Linear(120, 84)
        self.fc3 = nn.Linear(84, 10)

    def forward(self, x):
        x = self.pool(F.relu(self.conv1(x)))
        x = self.pool(F.relu(self.conv2(x)))
        x = x.view(-1, 16 * 5 * 5)
        x = F.relu(self.fc1(x))
        x = F.relu(self.fc2(x))
        x = self.fc3(x)
        return x

net = Net()
Training the model
The model is trained by running over all the training images 2 times and using a stochastic gradient descent optimizer. Note that this is not much training and is possibly unstable if you replicate, so maybe train a few more loops.
import torch.optim as optim

criterion = nn.CrossEntropyLoss()
optimizer = optim.SGD(net.parameters(), lr=0.001, momentum=0.9)

for epoch in range(2):  # loop over the dataset multiple times

    running_loss = 0.0
    for i, data in enumerate(trainloader, 0):
        inputs, labels = data

        optimizer.zero_grad()

        outputs = net(inputs)
        loss = criterion(outputs, labels)
        loss.backward()
        optimizer.step()

        running_loss += loss.item()
        if i % 2000 == 1999:    # print every 2000 mini-batches
            print('[%d, %5d] loss: %.3f' %
                  (epoch + 1, i + 1, running_loss / 2000))
            running_loss = 0.0

print('Finished Training')
[1, 2000] loss: 2.202
[1, 4000] loss: 1.939
[1, 6000] loss: 1.713
[1, 8000] loss: 1.598
[1, 10000] loss: 1.544
[1, 12000] loss: 1.489
[2, 2000] loss: 1.397
[2, 4000] loss: 1.391
[2, 6000] loss: 1.350
[2, 8000] loss: 1.316
[2, 10000] loss: 1.303
[2, 12000] loss: 1.270
Finished Training
Saving the model and the classes
We will now save the model using the jit.trace function of PyTorch which transforms our model to TorchScript, so we can easily fetch it in our lambda function and execute it.
Further, we are saving our class names to later return an appropriate response in our lambda function.
We bundle both together in a tar archive called model.tar.gz.
Note that the input to our network is 4-dimensional, because the network expects a batch. In our case of the REST API, we will only send a single image. This is why we specify the trace_input as a vector of 1x3x32x32.
trace_input = torch.ones(1,3,32,32)
jit_model = torch.jit.trace(net, trace_input)

FOLDER = '/home/marc/pytorch-serverless/model/'
MODEL_NAME = 'simplecifar_jit.pth'
TAR_NAME = 'model.tar.gz'
CLASSES = 'classes'

path = os.path.abspath(FOLDER)
torch.jit.save(jit_model, os.path.join(path, MODEL_NAME))
tar_file = os.path.join(path, TAR_NAME)
with open(os.path.join(path, CLASSES), 'w') as file:
    for cls in classes: file.write(f'{cls}\n')

with tarfile.open(tar_file, 'w:gz') as f:
    f.add(os.path.join(path, MODEL_NAME), arcname=MODEL_NAME)
    f.add(os.path.join(path, CLASSES), arcname=CLASSES)
Uploading the model to AWS S3
We trained and saved the model and will now upload it to S3. Our lambda function will then be able to fetch the model from S3 and execute it.
A great part about this is: if you retrain your model and overwrite the file in S3, you don’t need to change your lambda function and it will serve the new model.
S3_BUCKET = 'mp-pytorch-serverless'

s3 = boto3.resource('s3')
s3.create_bucket(Bucket=S3_BUCKET, CreateBucketConfiguration={'LocationConstraint': 'eu-central-1'})
s3.meta.client.upload_file(str(tar_file), S3_BUCKET, TAR_NAME)
Defining the lambda function
A lambda function is simply code which is executed at AWS. Each time you call it, AWS will run your code. It is called serverless, because you yourself don’t have to deal with the servers, but rather Amazon does.
If your function is called many times in parallel, AWS will make sure to scale it appropriately.
A caveat of AWS lambda is that the size of your function code and dependencies is 250MB and PyTorch dependencies consume more than that.
The good news is that there is a way around that, because you can save more in the /tmp folder. And even better news is that there already exists a so-called lambda layer for PyTorch which has all the needed dependencies and unzips them in the /tmp folder which we will be using.
The lambda layer provides us with the import unzip_requirements which makes sure you can use PyTorch and all the dependencies.
We will now discuss the different parts of our pytorch/prediction.py lambda function.
Loading the model in the lambda function
Loading the model within the lambda function works this way:
- We load the tar.gz file from S3 and extract it in a tmp folder
- We load the classes as a list from the classes file of the unzipped files
- We load the model using
torch.jit.loadand return both the model and the classes
Importantly, this is only done when the lambda function is not “hot”, i.e. when it is starting new. When it serves requests after being initially loaded, it is able to skip this step. Therefore, on the first execution, it will take a bit longer for our prediction, but then subsequently it is quite a bit faster.
def load_model():
    tmp_dir = '/tmp/pytorch-serverless'
    local_model = f'{tmp_dir}/model.tar.gz'
    os.makedirs(tmp_dir, exist_ok=True)
    s3.download_file(S3_BUCKET, MODEL, local_model)
    tarfile.open(local_model).extractall(tmp_dir)
    os.remove(local_model)
    classes = open(f'{tmp_dir}/classes', 'r').read().splitlines()
    model_path = glob.glob(f'{tmp_dir}/*_jit.pth')[0]
    model = torch.jit.load(model_path, map_location=torch.device('cpu'))
    return model.eval(), classes
Transforming the image which is sent via POST to a PyTorch compatible format
Our REST endpoint expects to receive an image which we will transform, so it is in the correct 4-dimensional batch format (1x3x32x32 as described above) which our network expects.
We will be sending the byte stream of the image in the variable file and the name of the file in the variable name. Thus, we extract these parts from the body, use PIL to transform the bytestream into an image and then apply our preprocess_pipeline which resizes the image appropriately, transforms it to a tensor and normalizes the tensor.
Finally, we unsqueeze to transform the image (3x32x32) to a batch (1x3x32x32) which we can feed to the network for a prediction.
preprocess_pipeline = transforms.Compose([
    transforms.Resize(50),
    transforms.CenterCrop(32),
    transforms.ToTensor(),
    transforms.Normalize((0.5, 0.5, 0.5), (0.5, 0.5, 0.5))
])

def image_to_tensor(preprocess_pipeline, body):
    data = json.loads(body)
    name = data['name']
    image = data['file']
    dec = base64.b64decode(image)
    img = PIL.Image.open(io.BytesIO(dec))
    img_tensor = preprocess_pipeline(img)
    img_tensor = img_tensor.unsqueeze(0)
    return img_tensor
Making the prediction with our model
This part is very simple. We take our batched image, make a forward pass through the network and receive the results. We receive a 1x10 dimensional result and apply the softmax function, so the 10 values sum to 1 and we can interpret the values as probabilities. We use our list of classes to retrieve the predicted name of the highest probability class.
def predict(model, classes, image_tensor):
    predict_values = model(image_tensor)
    softmaxed = F.softmax(predict_values, dim=1)
    probability_tensor, index = torch.max(softmaxed, dim=1)
    prediction = classes[index]
    probability = "{:1.2f}".format(probability_tensor.item())
    return {'class': prediction, 'probability': probability}
The lambda function handler
The last small missing piece is the function which is called as the entry point to our lambda function.
It puts the pieces together by calling both the image_to_tensor and the predict function and returns the result.
def lambda_handler(event, context):
    image_tensor = image_to_tensor(preprocess_pipeline, event['body'])
    response = predict(model, classes, image_tensor)
    return {
        "statusCode": 200,
        "body": json.dumps(response)
    }
Locally testing the lambda function
We could upload the lambda function now and generate a callable REST API in the AWS API Gateway and then test the API, but it would be nicer to be able to test this locally.
This is possible using the AWS serverless application model (SAM) which is easily installed using pip: pip install --user aws-sam-cli.
We can define a template in a yaml file which defines our lambda function and an API Gateway. Our lambda function code is in the folder pytorch/ (CodeUri) and the file is called prediction.py thus yielding prediction.lambda_handler as our Handler.
The rest of the template.yaml should be rather self-explainable, otherwise refer to the documentation. Here is the most important part:
Resources:
  ImagePredictFunction:
      Type: AWS::Serverless::Function
      Properties:
          CodeUri: pytorch/
          Handler: prediction.lambda_handler
          Runtime: python3.6
          MemorySize: 256
          Environment:
            Variables:
              S3_BUCKET: !Ref S3Bucket
              MODEL: !Ref Model
          Policies:
            - S3ReadPolicy:
                BucketName: !Ref S3Bucket
          Layers:
            - !Ref LambdaLayerArn
          Events:
              PyTorch:
                  Type: Api
                  Properties:
                      Path: /image_classification
                      Method: post
Setting up the local API Gateway
You can start a local API Gateway running on port 3000 by executing: sam local start-api -n env.json where env.json defines your environment variables and looks like this (you should adapt the S3 bucket, of course!)
{
    "ImageClassificationFunction": {
      "S3_BUCKET": "mp-pytorch-serverless",
      "MODEL": "model.tar.gz"
    }
}
Now, we can send POST requests to our local API at localhost:3000/image_classification
For a very basic test script in PHP I am calling it like this:
<?php
$endpoint = "http://127.0.0.1:3000/image_classification";
if($_REQUEST['action'] == 'submit') {
    $filePath = $_FILES['file_upl']['tmp_name'];
    $fileName = $_FILES['file_upl']['name'];
    $imageData = file_get_contents($filePath);
    $encodedImage = base64_encode($imageData);
    $data = array('file' => $encodedImage, 'name' => $fileName);
    $data_string = json_encode($data);
    $ch = curl_init($endpoint);
    curl_setopt($ch, CURLOPT_CUSTOMREQUEST, "POST");
    curl_setopt($ch, CURLOPT_POSTFIELDS, $data_string);
    curl_setopt($ch, CURLOPT_RETURNTRANSFER, true);
    curl_setopt($ch, CURLOPT_HTTPHEADER, array(
        'Content-Type: application/json',
        'Content-Length: ' . strlen($data_string))
    );
    $result = curl_exec($ch);
    var_dump($result);
}
?>

<form name="file_up" action="" method="POST" enctype="multipart/form-data">
    <input type="file" name="file_upl" id="file_upl"/>
    <input type="submit" name="action" value="submit"/>
</form>
Deployment to AWS
We have everything together, so we can package it up. Run the following command from the aws/ folder:
sam package --output-template-file packaged.yaml --s3-bucket mp-pytorch-serverless
which creates a file called packaged.yaml.
Then to create the lambda function, the IAM permissions and the API Gateway endpoint run:
sam deploy --template-file packaged.yaml --stack-name pytorch-serverless --capabilities CAPABILITY_IAM --parameter-overrides S3Bucket=mp-pytorch-serverless Model=model.tar.gz
(again replace your S3Bucket).
You can adjust your upload script to refer to the API Gateway of AWS at this point which you will find in the API Gateway. Another option is to retrieve the endpoint using the command line:
aws cloudformation describe-stacks --stack-name pytorch-serverless --query 'Stacks[].Outputs[?OutputKey==`ImagePredictApi`]' --output table
production pytorch python api machinelearning deeplearning serverless aws lambda
1933 Words
March 12, 2019